With added info and screen dumps by John K3WWP #0002
NOTE: Please be sure that you are using the latest version of GenLog that is appropriate for your Windows OS.
I recently installed GenLog but found it a little intimidating. I discovered some issues in understanding how to create a "Silver Log' and it took me a while to make GenLog generate a log file appropriate for the NAQCC autologger. Here I suggest what a new user needs to know to feel more comfortable using GenLog for our Sprint. Once you see how simple Genlog is, and gain a little experience, I think you will look forward to using it - not only for our NAQCC sprints, but other contests and sprints as well.
Getting Started - GenLog is available as complete freeware. It is unique among logging programs (or one of a very few) in that it provides a template specifically for our NAQCC Sprint format. You should download the latest version of the base application and its latest update. The download kits can be found at: http://www.qsl.net/w3km/. Installation is straight forward and I installed it in the default directory of C:\genlog32\.
NAQCC-specific Membership File - GenLog does some really nice things automatically. For example, when you enter a callsign it will look in the NAQCC.DAT file to see if that call belongs to a NAQCC member. If a corresponding record is found, GenLog automatically fills in the State, Member#, Multiplier and Points fields, saving you quite a bit of your time. If you have already worked the same multiplier prior to the entry, GenLog will enter a dash in the multiplier column when the final log is produced. Very nice! This file is included in the standard installation but you should always download the latest version prior to the Sprint. You can find the very latest version in a .zip file via the General Sprint Rules page here on the web site. It's updated the day of the sprint so as to include all the most recent new members. Check the included readme.txt file to be sure it's the one for the current upcoming evening sprint. Extract the NAQCC.DAT file and place it in the directory that contains GenLog. Another fairly up to date version is available on the GenLog site at: http://www.qsl.net/w3km/gen_data.zip. But it won't contain the very latest new members.
Working with GenLog - You cannot break anything when playing with GenLog. You might make plenty of mistakes at first and that is ok. This is actually the best way to become comfortable with GenLog. Just make up fake contest entries and see what GenLog does with the data. Use some real member call signs so you can see how GenLog automatically updates fields.
When you feel comfortable with your testing, then you will be ready to confidently use GenLog in a live Sprint. That is the ultimate goal.
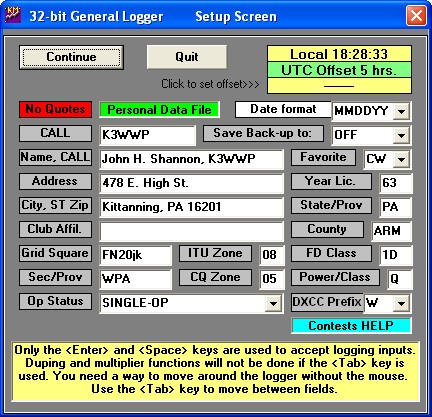
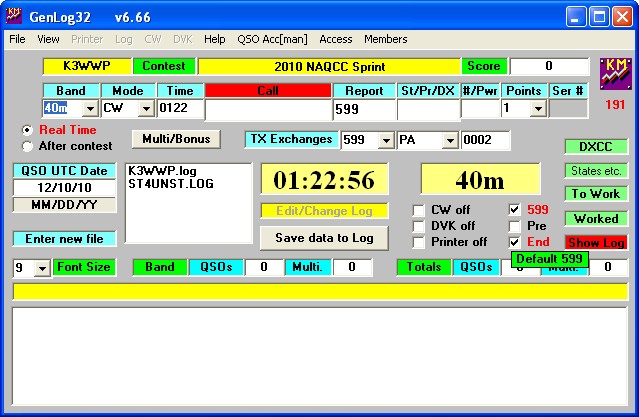
Starting GenLog - When you start GenLog for the first time you must enter certain information in the initial screen. Fill in as many fields as you can. Not all of this information is required for the NAQCC Sprint, but it will help if you decide to use GenLog for other contests and sprints. Subsequently you will see this same screen each time you start GenLog with the info you originally input. You can change any values whenever necessary. This picture shows the data for K3WWP. Obviously yours will be different.
Please note the info at the bottom of this screen about using only the [ENTER] or [SPACE] keys to accept logging inputs. When this tutorial says [SPACE], either [SPACE] or [ENTER] may be used. Both are identical in that case. Use whichever is easier for you. If the tutorial says [ENTER], in that case [ENTER] must be used. Never use the [TAB] key except as stated.
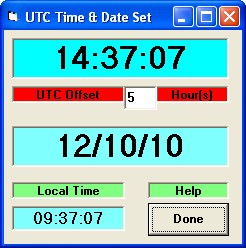
It is very important to fix the UTC offset by clicking as shown on the screen ("Click to set offset>>>"). When you do this window will pop up. Fill in the appropriate offset (4 for EDT, 5 for EST or CDT, 6 for CST or MDT, and so on. You'll know the value for your time zone).
After you're done setting the offset, click "Done", then "Continue" to move on to the next screen here.
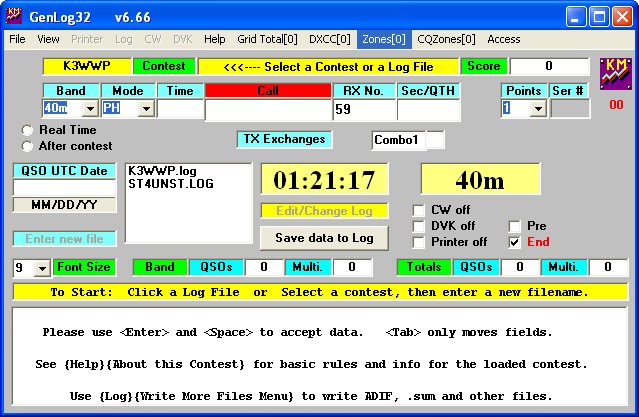
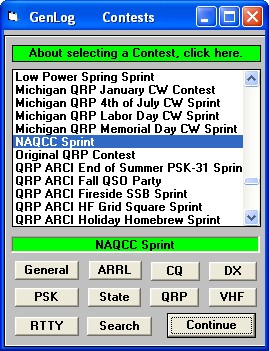
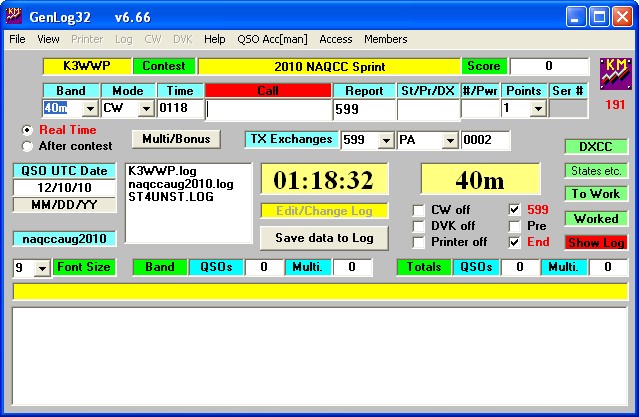
Select the Contest - You must tell GenLog the name of the contest. The screen input format and output file format is determined by selecting NAQCC Sprint as the contest. Here is how you do that: Click on 'File', then 'New contest' (or click the word 'Contest' in the green box to the left of "<<<---- Select a Contest or a Log File") to bring up this window.
Click the "QRP" button. This will limit the contest names to just those that are considered QRP contests. Scroll down to 'NAQCC Sprint' and select that contest. Then click "Continue"'. You will see a subtle difference in the screen format. Some of the fields will be customized to our Sprint as shown here.
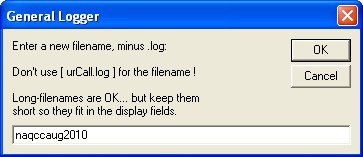
Name Your File - You need to give GenLog a name for the files it will create during the session. Click on 'File' and then 'New Filename' (or click 'Enter new file' in the blue box). Enter in a unique file name such as naqccaug2010 (meaning the NAQCC Sprint that took place in Aug 2010). Note: In case you missed it in the GenLog instructions, DO NOT name this file with your call letters.
Click "OK" and you will see the filename listed in the box to the left of the digital time on the screen. You can recall the file at a later time by clicking the filename.
Entering Contacts During the Contest - You have the option of entering contacts in Real Time or after a contest. We'll describe the Real Time option and note any difference in using the After contest option.
To use real time entry, click on the 'radio button' to the left of "Real Time" as shown in the picture above. You'll see the clock time go into the "Time" field (01:18:32 shows up as 0118) and it is updated each minute. BE SURE your computer clock and the UTC offset are set correctly. Accurate time is very important in the cross-checking of logs.
If you log on paper and then transfer to GenLog after the contest, you must select the 'radio button' to the left of "After Contest". If you are doing it this way, then you must enter the Date in the format indicated in the "QSO UTC Date" box, and the time of the contact in the "Time" box. Use all four digits. For midnight UTC you would enter 0000. For 25 minutes after midnight you would enter 0025. This is a good way to practice using the program and becoming familiar with it.
Now let's continue with real time logging.
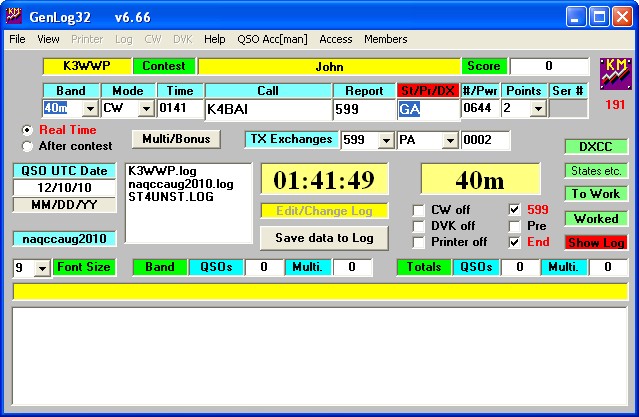
Logging A QSO - The first thing to check is that the correct "Band" has been selected. Click on the drop down button to the right of the band indicator box and choose the correct band (or type 80, 40, or 20 in the "Call" field and press [SPACE]). Set the "Mode" box to 'CW' if it is not there already. Enter the call sign of the station you are working in the "Call" field, then press [SPACE]. If the call is found in the NAQCC.dat file, then the STATE abbreviation and NAQCC# will display, the MULTIPLIER will be set and the "Points" value will change to 2. This is a HUGE time saver. Remember two important things though.
1 - You must have the very latest naqcc.dat file from the NAQCC web site or the newest members will show up as non-members.
2 - While it is nice that GenLog automatically inserts the state when you enter the call of a member, keep in mind that some folks occasionally operate portable in a different state and of course GenLog doesn't know that, so be sure that the state they send is the same as what GenLog inserts, if not, go to the St/Pr/DX field and change it.
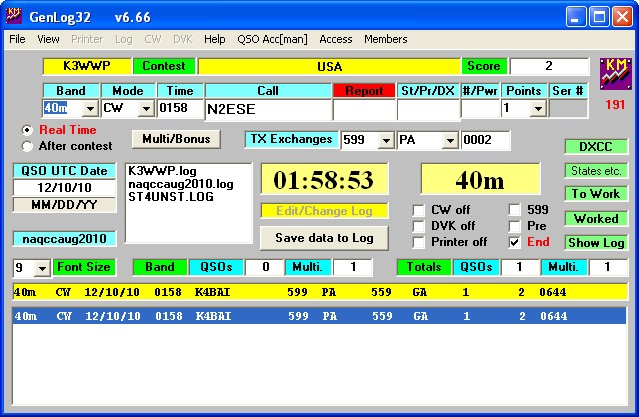
Here's how the screen will look with K4BAI entered.
You can leave the information in the "Report" field at the default value at "599" as it is not required for log cross-checking. If you do want to enter the "Report" manually for each QSO, uncheck the box before '599'. Then you will have to enter the RST that is sent to you in the "Report" box. This is shown in the next 2 pictures with 559 manually entered.
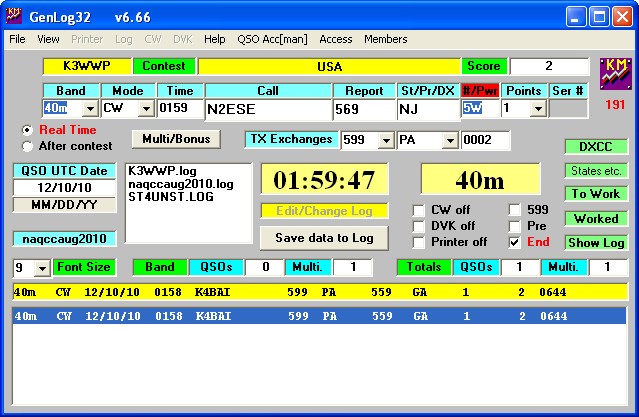
Let's look at a case where the station worked is not a member or is a member but you don't have the latest naqcc.dat file installed. In that case after typing in the call and pressing [SPACE], you must enter the (RST if necessary in the REPORT field), state, province or country sent to you in the St/Pr/DX field. Use the standard abbreviations. In the #/Pwr field, enter the power value (include the 'W' for WATTS as in 5W) sent by the non-member contact or the member number if that's the case. The next two pictures show this with a non-member.
If it was a new member and you had to enter a member number, change the "Points" field to a '2'.
In all cases above, when entering data, always use [SPACE] rather than the mouse (and DEFINITELY NOT [TAB]) to move between fields as it speeds up the entry process. When you get to the large gray 'SaveData to Log' button, press [SPACE] yet again. This will place the contact into the working log file. If it does NOT go into the log then there is a field that has probably been left with unacceptable values (maybe a field is BLANK). Use [TAB] or the mouse to move to the field that needs correcting, change the info and press [SPACE] to accept the change.
You will see that a new logged contact line is added to the bottom of the screen. The cursor will automatically jump back to the "Call" box (or "Time" if using After contest mode). You are now ready to start a new contact entry. The "Band" is ASSUMED to be the same so be sure to modify it when changing bands. (The quickest way to change bands is to simply type 80, 40, or 20 in the CALL box and press [SPACE])
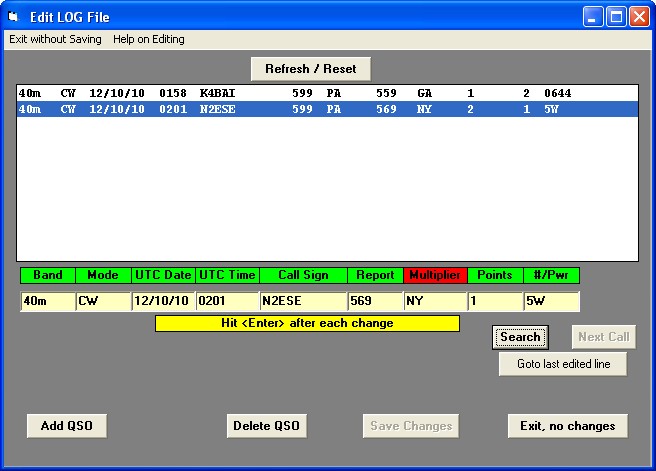
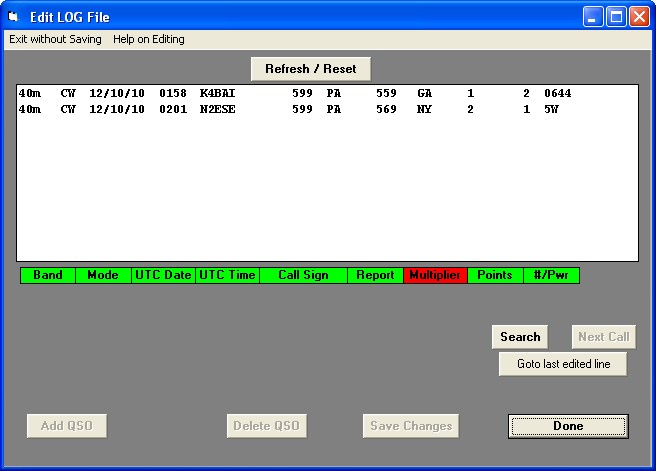
Making Corrections - Suppose you note that N2ESE should have been NY, not NJ after you enter his QSO. You can make changes to the working log while running GenLog. There is a yellow "Edit/Change Log" box located under the displayed digital TIME that will allow you to change field data in the 'working log' entries. Editing through this interface will correctly adjust MULTIPLIERS but make sure any changes you make are COMPLETE and CORRECT as far as the remaining fields are concerned. Be sure to press [ENTER] after EACH field change. Here's what the Edit window looks like after clicking on NJ and changing it to NY.
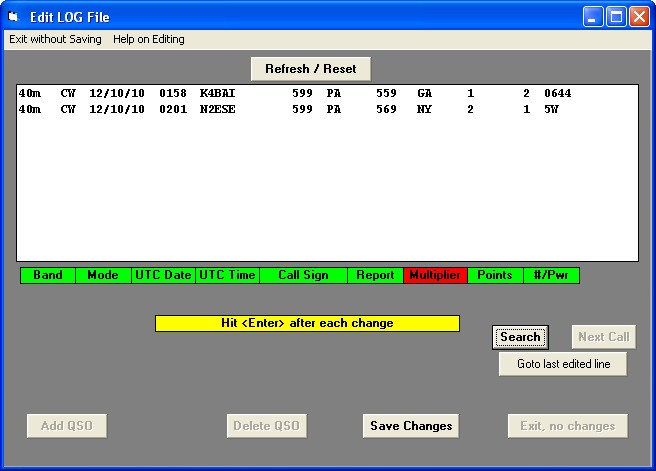
And then hitting [ENTER] to log the change. If that was the only change, click "Save Changes" and "Done" to return to the main screen.
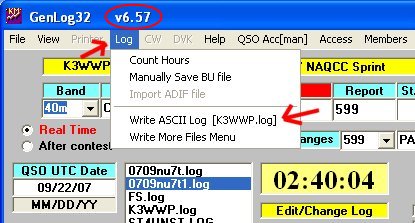
Creating the Log File - After you have entered your last contact, you are ready to create the NAQCC Sprint .log file. Your version of GenLog must be v6.57 or higher for the created file to be in the correct format. Look at the top of the screen for 'Log' and click on that. Now click on 'Write ASCII Log [YOURCALL.log]' You see that the name of the log is the same as the callsign that you entered on the first screen (your call). Since the screen dump here is from my setup it shows my (K3WWP) call. Yours will show your call instead. The file will be saved in the same folder that contains the GenLog program and all the GenLog data files.
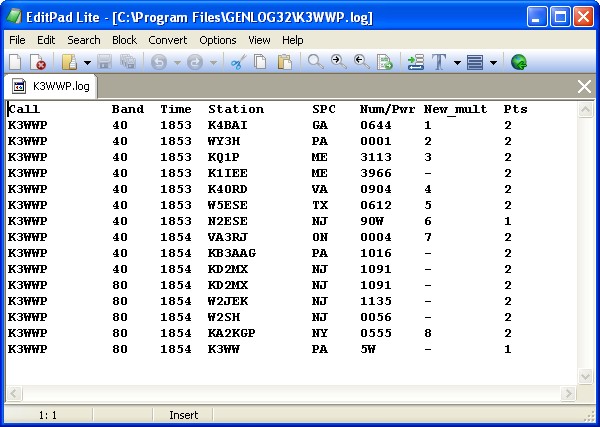
You then open the [YOURCALL.log] file in Notepad or any text editor (EditPad Lite shown here since that is what I use. If you read the documentation that comes with GenLog and have put a copy of notepad.exe in the GenLog folder, the [YOURCALL.log] file will open automatically as soon as you create it. Then you can make any final changes, additions, or corrections.
If you make any MANUAL corrections to the .log file then you will need to make sure the multipliers are correct after your changes. Scan down the right most column and make sure the QSO point value is correct for your contact, two points for a member and one for a non-member. Scan down the BAND column and adjust if necessary.
If you modify a line that requires the MULTIPLIER to be corrected then it might affect ALL OTHER multiplier values starting from that point and going down. That could be a pain. It is worth it to make sure you enter the data into GenLog correctly the first time so that you do not have to fix anything that pertains to adjusting the multipliers in this file! Or make the corrections as described above using the integral edit feature.
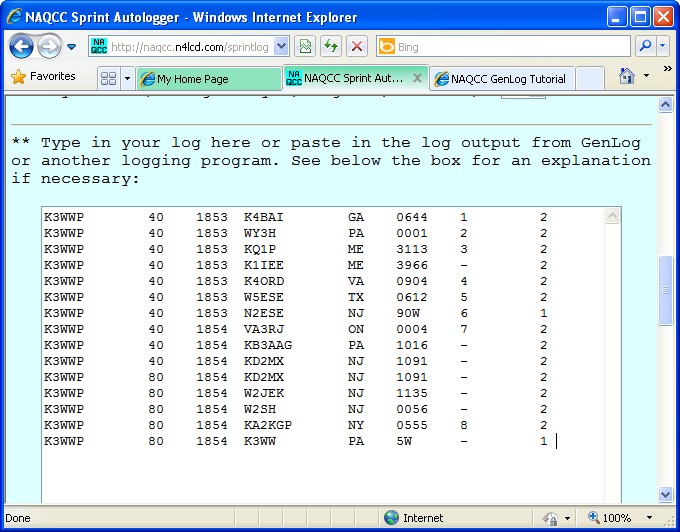
Submit Your Log - The lines pertaining to contacts are exactly the way that NAQCC wants your information. Highlight all of the lines EXCEPT the first line containing labels, right click on the mouse, choose COPY (or simply press CTRL-C on your keyboard), go to the area for entering the log information in the NAQCC on-line autologger, and PASTE (CTRL-V) the log data into that data box.
Miscellaneous Issues - There are a couple of check boxes of interest on the second screen that may need further explanation as well as a couple other things about the program.
The first checkbox is '599'. If this is checked then the value 599 is automatically placed in the contact field labeled 'Report'. If the checkbox does NOT have a check in it then you will need to enter a signal report manually.
The second checkbox is 'End'. If this checkbox is checked then the very last line in the 'working log' will always remain visible. If the checkbox does NOT have a check in it then the first entries in the 'working log' are always visible.
For our NAQCC sprint, the checkboxes labeled CW off, DVK off, Printer off, Pre should all be empty unless you are an advanced user and know what they are all about. If you're an advanced user, you're probably not reading this anyway. HI.
The boxes at the right of the screen labeled:
DXCC
States etc.
To Work
Worked
Show Log
Are for showing various lists of items. For our NAQCC sprint, the box labeled 'Show Log' should be red (if not, click in the box to change from green to red), and the rest green. That way, the log shows in the box at the bottom of the screen.
The Multi/Bonus button is again for advanced users and has no bearing on our sprint.
If the print is too small on the screen, it can be adjusted with the drop down list to the left of 'Font Size'
On the same line as 'Font Size' are boxes that show number of QSO's and multipliers on the active band, and total for all bands.
That pretty much covers the use of GenLog except for one more reminder about something that causes 99% of any problems folks have with GenLog. When entering data anywhere on the screen, navigate from field to field ONLY in these three ways:
1. Mouse
2. [SPACE]
3. [ENTER]
DO NOT use [TAB]
[TAB] may be used to navigate from field to field when skipping around the screen, but ONCE YOU CHANGE INFO in a field, DO NOT use [TAB] then - ONLY Mouse, [SPACE], or [ENTER].
Quest for the Silver Log - Following the above steps should bring you up to speed very quickly on using GenLog and producing the specially formatted NAQCC Sprint log. Hopefully it will also help you attain the highly desirable 'Silver Log' listing and minimize the workload for the NAQCC Sprint log checker. (AMEN! - K3WWP)
If you've read this and are still confused about something, ask and we'll try to answer and modify the tutorial as appropriate.